Quick Wins for Every Creator
| App | Best For | Platform | Learning Curve |
|---|---|---|---|
| CapCut | TikTok/Reels | Mobile/Desktop | Very Low |
| Adobe Premiere Pro | Professional Work | Desktop | High |
| LumaFusion | Mobile Power-Users | iPad/iOS | Medium |
| DaVinci Resolve | Color Grading | Desktop/iPad | High |
The Mobile Powerhouses for On-the-Go Editing
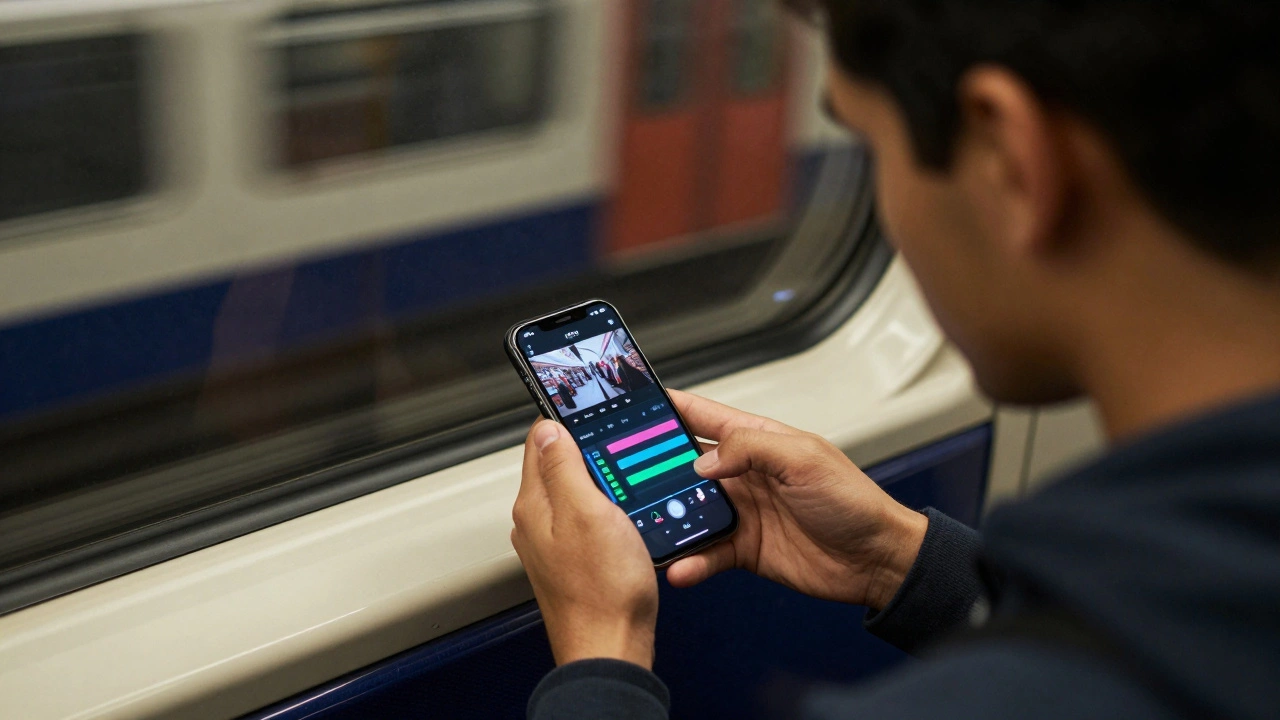
If you're a London creator, you're likely editing while commuting. You need something that doesn't crash when you're switching between 4K clips and high-res overlays. For most of us, best editing apps for mobile are those that handle the heavy lifting of AI captioning and background removal instantly.
For those who want a professional timeline on an iPad, LumaFusion is a multi-track video editor for iOS and Android that mimics the layout of professional desktop software. Unlike basic editors, it allows for complex layering and precise audio mixing. If you're filming a vlog at the Tate Modern and want to sync multiple camera angles right there, this is your best bet.
Then there's the speed-demon approach. CapCut isn't just for beginners; its integration with the TikTok music library and auto-captioning features saves hours of manual typing. In 2026, the AI-driven "Auto-Cut" feature can analyze your footage of the London skyline and sync transitions to the beat of a trending track in seconds. It's less about "crafting" and more about "optimizing" for the algorithm.
Professional Desktop Suites for High-End Production
When you move from a smartphone to a workstation, the goal shifts from speed to precision. If you're producing a documentary-style piece on London's hidden history or a commercial for a brand in Canary Wharf, you need a non-linear editor (NLE) that can handle massive file sizes and complex color grades.
Adobe Premiere Pro is an industry-standard timeline-based video editing software part of the Creative Cloud suite. It's the gold standard for a reason. The integration with Adobe After Effects means you can create high-end motion graphics for your intro and jump back into your edit without exporting files. However, it's a subscription model, and the learning curve is steep-you'll likely spend your first week just figuring out why your audio is peaking.
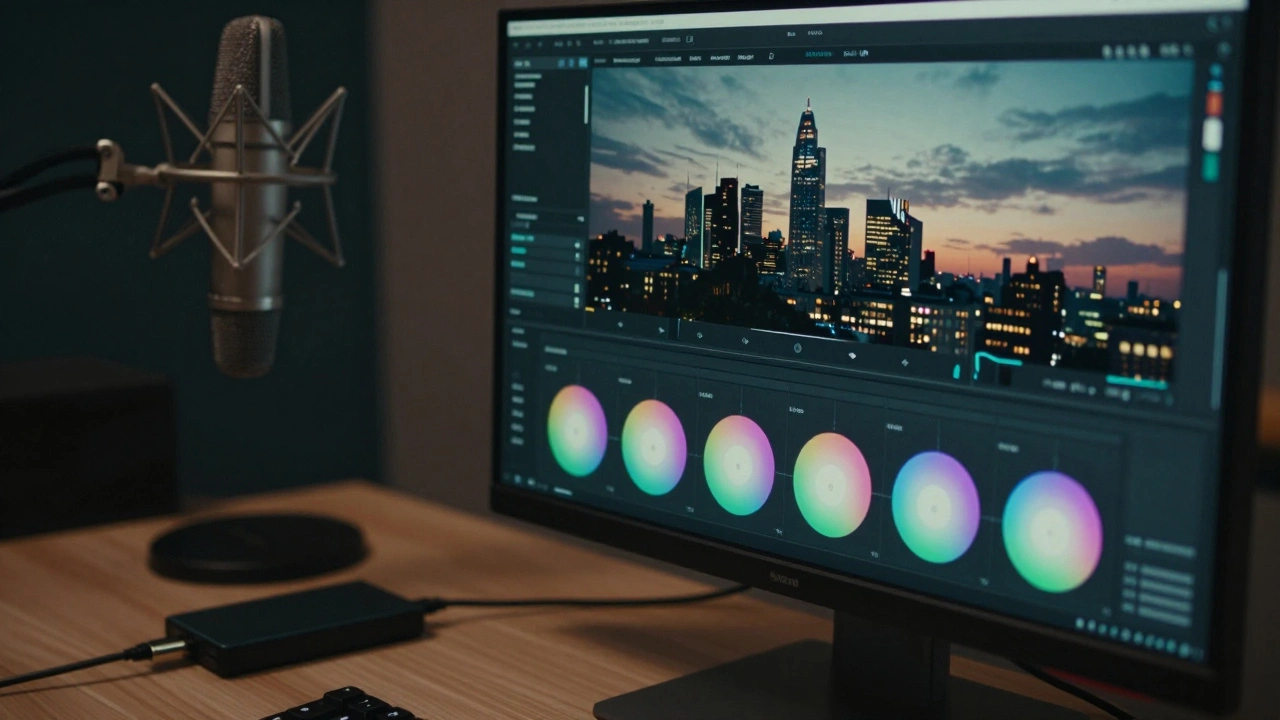
If color is your obsession, look at DaVinci Resolve, a professional post-production software specializing in advanced color correction and grading. Many creators are switching to Resolve because the free version is incredibly powerful, and the color wheels allow you to give your London footage that specific "moody" or "cinematic" look that makes a video feel like a movie rather than a home clip.

Which One Should You Actually Use?
Choosing a tool isn't about which one is "the best" in a vacuum; it's about where you are in your growth journey. If you're just starting and your main goal is to grow a following on Instagram, don't waste a month learning Premiere Pro. Start with CapCut. The friction is lower, and the results are instant.
However, if you're starting to land paying clients-say, a local boutique in Covent Garden wants a polished 30-second ad-the mobile apps will start to feel limiting. You'll find yourself fighting with the screen size and the lack of keyboard shortcuts. That's when you transition to a desktop setup. A common pro-workflow in 2026 is to do the "rough cut" on a mobile device while traveling and the "final polish" (color and sound) on a desktop machine.
Common Pitfalls to Avoid
- Over-relying on Templates: Everyone uses the same CapCut templates. If your video looks like every other video in the Shoreditch area, you'll lose your unique voice. Use templates for structure, but customize the timing and colors.
- Ignoring Audio Quality: You can have 8K visuals of the London Eye, but if the wind is whipping through your mic, people will swipe away. Use tools like Adobe Podcast or the built-in noise reduction in CapCut to clean up your audio.
- Exporting at the Wrong Ratio: Nothing looks more amateur than a 16:9 landscape video with black bars on a vertical TikTok feed. Always set your project aspect ratio first.
The Hybrid Workflow Checklist
If you want the best of both worlds, follow this sequence to keep your sanity and your quality high:
- Capture footage in 4K (if storage allows) to give yourself room to crop in during the edit.
- Use a mobile app like CapCut for the initial "culling"-delete the bad takes while the memory is fresh.
- Transfer the selected clips to a desktop via a fast SSD or cloud service.
- Perform detailed color grading in DaVinci Resolve to create a consistent visual style.
- Finalize the edit in Premiere Pro or Resolve and export in the specific format required by the platform (H.264 for most).
Do I need a powerful computer for DaVinci Resolve?
Yes, Resolve is very GPU-intensive. If you're using a MacBook, the M-series chips handle it well, but on Windows, you'll want at least 16GB of RAM and a dedicated graphics card to avoid lag when scrubbing through 4K footage.
Is CapCut free for professional use?
CapCut has a very generous free tier, but the Pro version unlocks more advanced AI features and transitions. For most creators, the free version is enough, but check the licensing on some of the music tracks if you're making a commercial for a business.
What is the best way to move files from iPhone to Mac for editing?
AirDrop is the fastest for a few clips, but for full projects, use an external SSD with a USB-C connection. Cloud services like Google Drive can work, but they often compress the files or take forever to upload large 4K video files.
Can I use LumaFusion on an Android tablet?
Yes, LumaFusion is available on the Google Play Store. It provides a similar high-end experience on Android tablets as it does on the iPad, making it a great choice for creators who don't want to be locked into the Apple ecosystem.
Which app is better for subtitles: CapCut or Premiere Pro?
For speed and style, CapCut wins. Its auto-captions are incredibly fast and come with preset styles that are popular on social media. Premiere Pro's transcription is more accurate for long-form content and offers more control over the exact font and placement for professional work.
Next Steps for Your Content
If you've mastered the basic cut, your next move is to experiment with B-roll. Instead of just talking to the camera, overlay clips of the city-the red buses, the crowds at Oxford Street, or the quiet corners of Hampstead Heath. This keeps the viewer engaged and makes your video feel high-production regardless of which app you're using.
If you find yourself spending too much time on the technical side, consider a simple template system. Create a set of "brand colors" and font choices that you use for every video. This removes the decision fatigue and lets you focus on the storytelling, which is what actually grows your audience in the first place.